DSL Setup – Windows ME
Skip to Step
1 | 2 | 3 | 4 | 5 | 6 | 7
- On the main desktop, right click on the My Network Places icon.

- On the menu that comes up click on Properties.

- Next left click on the Internet Protocol (TCP/IP) for you network card..
Then click the button labeled Properties at the middle of the box.

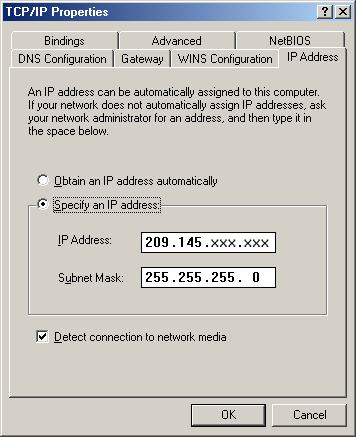
- Make sure you are on the IP Address tab.
Click the button next to Specify an IP adress.
In the field labeled IP Address: type the IP address which was provided to you within your welcome kit.
In the field labeled Subnet Mask: type in the subnet mask which was provided to you within your welcome kit (Note: The subnet mask for most accounts will be 255.255.255.0).

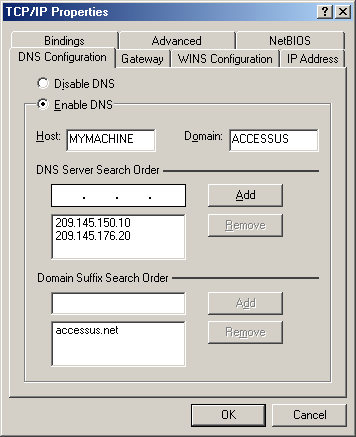
- Click on the DNS Configuration tab.
Make sure that the button is in Enable DNS.
In the Host: box put the name of your computer in.
(Note: It doesn’t matter what name you put in this box.)
In the Domain: box put in ACCESSUS.
For the DNS Server Search Order we are going to type the following IP Addresses.
209.145.150.10 And 209.145.176.20
(Note: Once you have typed in the IP Address you must click add for it to go into the box below. Also another note the DNS address are not pingable.
Next for the Domain Suffix Search Order we are going to type in accessus.net and then hit add

- Next click on the Gateway tab.
In the field labeled New Gateway: type in the default gateway which was provided to you within your welcome kit. (Note: The default gateway should have the same first three sets of numbers as your IP address with the fouth set of numbers being only a 1, for example 209.145.150.1.)
Once that is entered hit add.

- Click OK on the box labeled TCP/IP Properties.
Click OK on the box labeled Network.
Once the drivers are loaded it will ask if you want to restart you computer.
Click Yes.
Once the computer has restarted you should be able to get online. If not please contact Access US Technical Support for more help.
